How to add a DMARC to your Google Domain
& Why It Matters for your SEO
DMARC (Domain-based Message Authentication, Reporting, and Conformance) is an email authentication protocol designed to safeguard your domain against email spoofing and phishing attempts. It empowers domain administrators to dictate how email servers should manage messages that do not pass authentication assessments, like SPF (Sender Policy Framework) and DKIM (DomainKeys Identified Mail).
Google and other search engines place a high priority on DMARC due to its ability to bolster email security, diminish spam, and combat phishing attacks targeting their users. Here's why DMARC holds significance for Google:
- Ensuring User Safety: Google is dedicated to delivering a secure and protected online environment for its users. Through the use of DMARC, website administrators can thwart cybercriminals from sending deceptive emails that seem to be from their domain. This proactive measure safeguards Google users against falling prey to phishing schemes, malware dissemination, and other email-related risks.
- Maximizing Email Deliverability: By implementing DMARC authentication, you can significantly increase the chances of your authentic emails reaching recipients' inboxes instead of being flagged as spam or filtered out by email providers. Google, including its popular Gmail service, gives priority to emails that have successfully passed DMARC authentication, ultimately enhancing the deliverability rates for legitimate senders.
- Reputation Management: Google considers domain reputation when evaluating the credibility of websites and their content. By incorporating DMARC, you show a dedication to email security and ethical email procedures, which can enhance your domain's reputation with Google. A favorable domain reputation can result in higher search engine rankings and increased visibility in Google search results.
- User Experience: Phishing attacks and email scams have the potential to erode user trust in online platforms and have a detrimental effect on the overall user experience. Google plays a crucial role in promoting DMARC adoption, thus enhancing online safety and instilling trust and confidence in its users. Websites that place a high value on user security and privacy are better positioned to achieve favorable rankings in Google's search results, given that user experience is a significant consideration in its ranking algorithms.
To sum up, Google values DMARC for its role in safeguarding users, enhancing email delivery rates, maintaining domain credibility, and elevating the digital experience. Websites that uphold email security and integrate DMARC stand a higher chance of gaining the confidence of users and search engines, resulting in improved search rankings and greater visibility in Google's search outcomes.
Now that you grasp the significance of DMARC for your website's domain, how can you ensure its implementation? Begin by conducting a test. There are several methods to do this, but installing the WOORANK extension on your browser is an excellent approach to gain insights into the areas your website should enhance for improved SEO, which includes DMARC. You can also request a free SEO report here.
Once you have tested your site and found your DMARC to be missing, it's time to add it to your Google, Square Space Domain. To do this, you will first need to log into your Google domains at https://domains.google.com/
Step one: Once logged into your Google domains account, you will see a panel on your left-hand side. The panel will read my domains, billing and account. Here you will click my domains.
Step two: Once you have located the domain you wish to modify, you will click on the link that reads manage.
Step three: Now you will find yourself on the screen for your domain overview. Here you will find billing information, services, and items to complete. This is not what you will click on. Instead, look again to the panel on the left-hand side. You should find a link that reads, DNS. Click that.
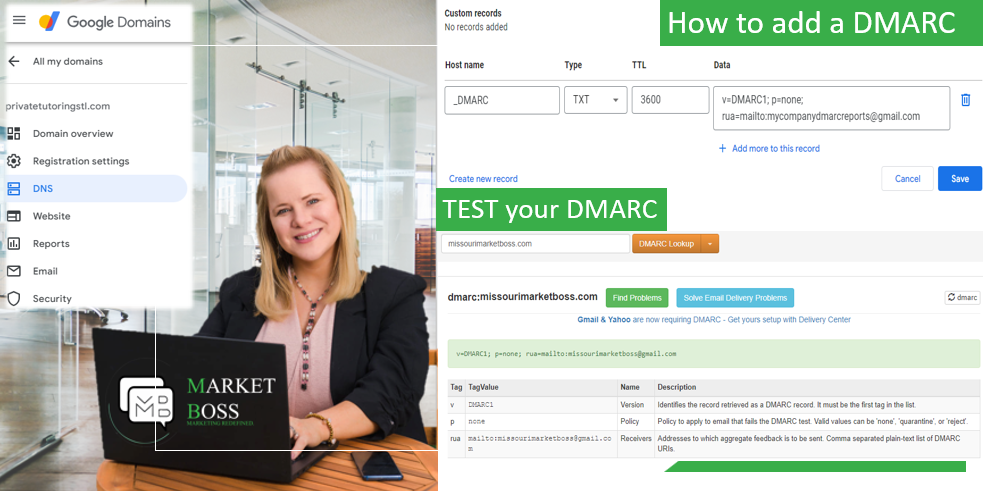
Step four: Under custom records, you will create a new record.
Step five: Under the host name, type _DMARC. This will auto populate your domain, and no need to type anything else within that box.
Step six: Under type, you will click the drop down and scroll until you reach TXT. Click that.
Step seven: Under TTL, leave as 3600.
Step eight: Add "Value" Information
Every DMARC record must include two essential tag-value pairs: "v" and "p".
- The only tag-value pair for "v" is v=DMARC1
- In the case of the "p" tag pair, "p=" can be combined with either none, quarantine, or reject. These tag-value pairs would appear as: p=none or p=quarantine or p=reject
Step nine: Under data, type in the following: v=DMARC1; p=none; rua=mailto:dmarcreports@missourimarketboss.com
Note: you will need to ensure that you have completed this on all domains.
Step ten: Verify your website's domain again to confirm the correct installation of DMARC. Ensure the Record is Configured Accurately. The final step involves conducting a DMARC Record Check to ensure the accuracy of the values and syntax in the newly created record.
How did it go? Were you successful in setting up your DMARC on your Google Domain using these straightforward ten steps? If so, we would greatly appreciate your feedback through a Google review or by sharing this article. Your input helps us in producing more high-quality content similar to this one.
To receive further guidance on SEO, Social Media Management tips, or anything related to digital marketing, subscribe to our weekly newsletter.